Running Dungeons & Dragons online has never been more accessible. Whether you're a first-time Dungeon Master or an experienced Game Master transitioning from in-person play, this complete guide will walk you through everything you need to run D&D 5e online using Realm VTT — from creating your first character to exporting custom content for future campaigns.
Unlike other virtual tabletops that require hours of setup or technical expertise, Realm VTT is designed to get you playing fast. By the end of this guide, you'll know how to create characters, import game data, manage maps and scenes, and save your custom content for reuse across campaigns.
New to VTTs entirely? Realm VTT includes an interactive demo with a built-in user interface tour. Click the "Try Demo" button on the homepage to get a guided walkthrough of the basic interface. You can then experiment with tokens, scenes, character sheets, and core gameplay mechanics in a risk-free environment before creating your first campaign.
Getting Started: Your First Campaign
When you create a new campaign in Realm VTT, you'll immediately notice something different from other platforms: the D&D 5e (2024) ruleset and character creation system are built in. You can import the free SRD (System Reference Document) content with one click, giving you access to hundreds of monsters, spells, items, and feats. The game mechanics, dice rolling, and character sheet system handle all the rules automatically — no manual data entry or extra purchases required to get started.
Creating Your Campaign
To create a campaign, you'll need to:
- Enter a campaign name — Something memorable like "Dragon Heist" or "Lost Mine Campaign"
- Select a ruleset — Choose D&D 5e (2024 rules) or another supported game system
That's it. Once you create the campaign, you'll see the Welcome Modal that shows all the modules you own that work with your chosen ruleset. This includes:
- Free SRD modules — The System Reference Document with basic NPCs, spells, and items
- Purchased marketplace modules — Any premium content you've bought
- Your custom modules — Content you've created and exported from other campaigns
You can click "Import" on any module to add its content to your campaign. The import process downloads all the NPCs, spells, items, and other records from that module into your campaign's compendiums. You can import multiple modules, but they import one at a time.
If you don't have any modules yet, the modal includes a link to browse the marketplace where you can find both free and premium content.
Importing Game Data: The Module System
One of Realm VTT's most powerful features is its module system, which allows you to import pre-built content and game data instantly. Think of modules as content packs that contain everything from NPCs and spells to full adventure campaigns.
How to Import Modules
- Open the Modules Menu — Click the Modules icon in the left drawer (it looks like a puzzle piece)
- Browse Available Modules — The built-in marketplace shows official content including:
- D&D 5e SRD Module — Contains all open-license NPCs, spells, items, and feats
- Community Modules — User-created content including custom NPCs, magic items, and full adventures
- Premium Modules — Official adventures and sourcebooks (if you own them)
- Click "Import" — The module's content instantly becomes available in your campaign's compendiums
- Access Your Content — Open any compendium (NPCs, Spells, Items) to see the newly imported records
The module system means you never have to manually type in stat blocks or spell descriptions. Everything is already formatted, searchable, and ready to use.
What's in a Module?
Modules typically contain:
- NPCs with full stat blocks and abilities
- Spells organized by class and level
- Magic items with descriptions and properties
- Feats and class features for character building
- Pre-built encounters with token placement and map configurations
When you import a module, all of this content becomes searchable within your campaign. Need a goblin? Search "goblin" in the NPCs compendium, and every goblin from your imported modules appears instantly.
Creating Characters: The Step-by-Step Wizard
Realm VTT's character creation wizard is built specifically for D&D 5e (2024 rules) and handles all the complex math automatically. Here's how it works:
Step 1: Ability Scores
Choose how you want to generate your character's six core stats:
- Manual Entry — Type in scores directly (useful if you rolled physical dice)
- Roll 4d6 Drop Lowest — Classic random generation with Realm VTT rolling for you
- Point Buy (27 points) — Allocate points across abilities with values ranging from 8-15 before racial bonuses
The system validates your choices in real-time, so you can't accidentally break the rules.
Step 2: Class Selection
Pick your character's class from the full list of D&D 5e options. When you select a class, Realm VTT automatically applies:
- Hit die and starting hit points
- Saving throw proficiencies
- Skill selections (with prompts for player choice)
- Spellcasting ability (if applicable)
- Starting class features
No need to reference the Player's Handbook or worry about missing something. The system knows the rules and applies them correctly.
Step 3: Background Selection
Choose your character's background, which grants:
- Skill proficiencies
- An origin feat (new in 2024 rules)
- Ability score increases — you'll be prompted to choose which abilities receive bonuses
Backgrounds in the 2024 rules are more impactful than before, and Realm VTT makes sure you don't miss any of the benefits.
Step 4: Species (Race)
Select your character's species, which determines:
- Creature type (humanoid, fey, etc.)
- Size (Small, Medium, Large)
- Movement speed
- Special senses (darkvision, blindsight, etc.)
- Racial traits and abilities
After completing these four steps, your character sheet is functional and ready for play. You'll still need to manually add spells (by dragging them from the Spells compendium to your Actions tab) and starting equipment (dragged from the Items compendium to your Inventory tab), but the mechanical foundation is complete.
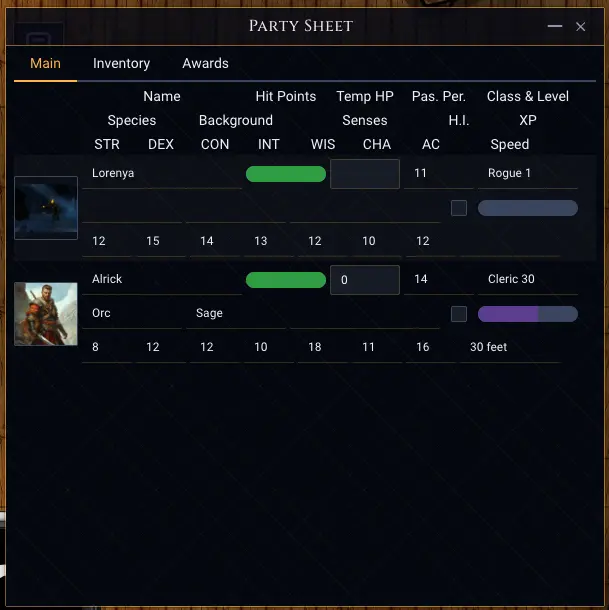
Character Sheet Organization
The character sheet is organized into intuitive tabs:
- Main — Ability scores, saving throws, HP, AC, proficiency bonus
- Skills — All 18 skills with proficiency toggles (unproficient / half / proficient / expertise)
- Actions — Initiative, attacks, damage rolls, and spell casting with automatic slot tracking
- Inventory — Equipment with weight calculations and attunement tracking
- Features — Feats, class features, weapon masteries, and shape-shifting support
- Notes — Rich text editor for backstory, session notes, and character journals
Everything updates automatically when you make changes. Equip armor, and your AC recalculates. Mark a spell slot used, and the system tracks it. The sheet handles the bookkeeping so you can focus on roleplaying.
Understanding the VTT Interface: Maps, Scenes & Controls
Now that you have characters, it's time to understand how to run an actual game session. Realm VTT's interface is built around three core concepts: Scenes, Tokens, and The Canvas.
What is a Scene?
A Scene is a playable map or encounter space. Think of it as a single location in your adventure — a tavern, a dungeon room, a forest clearing, or a city street. Every scene has:
- A background (either an uploaded image or a drawn canvas)
- A grid (square, hex, or isometric)
- Fog of War settings
- Lighting and vision configurations
- Tokens (characters, NPCs, objects)
You can create as many scenes as you need for your adventure. Most campaigns have a handful of key scenes prepared ahead of time, with new ones added on the fly as needed.
Creating Your First Scene
- Open the Scenes Tab — Click the Scenes icon in the left drawer
- Click "New Scene" — This opens the scene creation dialog
- Choose a Scene Type:
- Image Scene — Upload a pre-made battlemap (PNG, JPG, WebP)
- Canvas Scene — Start with a blank grid and draw your own map
- Configure Grid Settings — Select grid type (square/hex/isometric), size, and snap behavior
- Set a Name — Something descriptive like "Goblin Ambush" or "Town Square"
- Click Create — Your scene is now active and ready to use
For beginners, Image Scenes are the easiest starting point. Download free battlemaps from sites like r/battlemaps or purchase premium maps from creators on Patreon. Drop the image file into Realm VTT, align the grid, and you're ready to play.
Map Controls: Moving Your View
Understanding camera controls is essential for smooth gameplay:
- Pan the Map — Right-click and drag
- Zoom In/Out — Use the mouse scroll wheel
- Ping the Map — Hold the left mouse button or press Tilde (~) to show other players where you're looking
- GM Control-Ping — Hold Control while pinging to force all players' cameras to that location (perfect for dramatic reveals)
These controls become second nature within minutes. The ping feature, in particular, is essential for online play — it eliminates confusion when someone says "over there" by showing exactly where they mean.
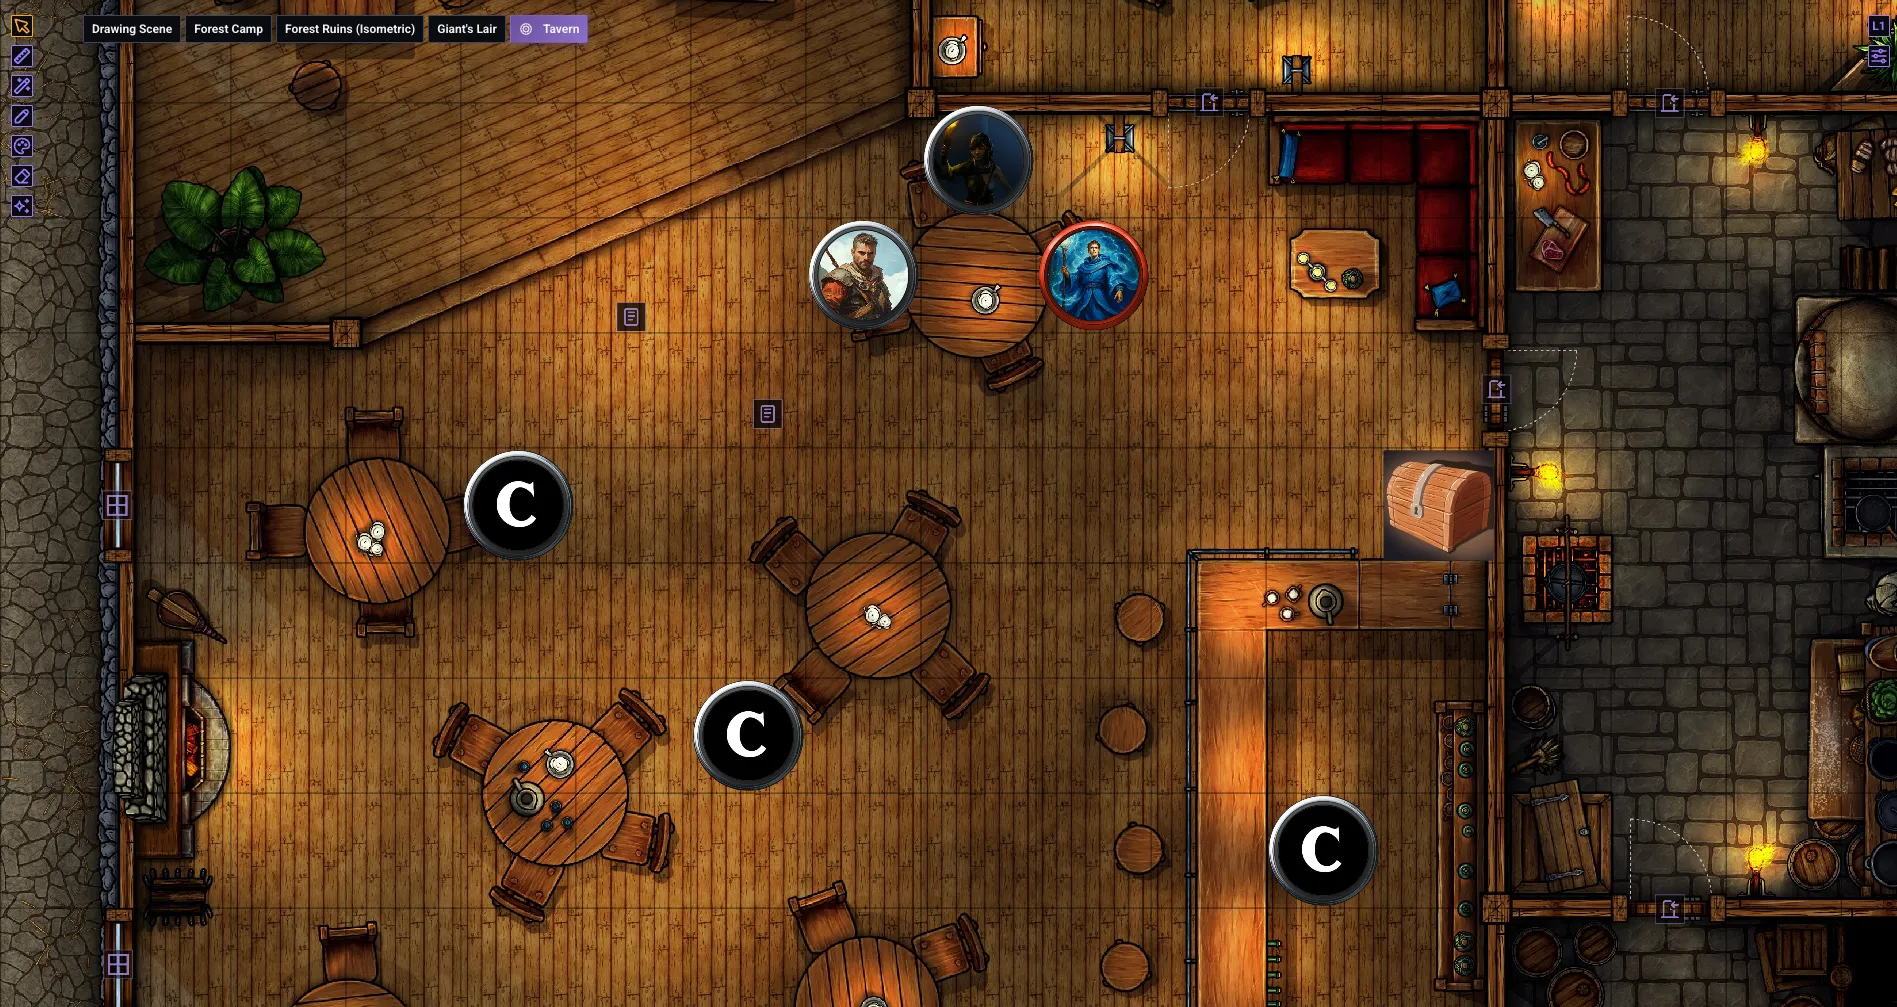
Adding Tokens to Your Scene
Tokens represent characters, NPCs, and objects on the map. To add a token:
- Make sure a scene is active — The active scene shows a blue indicator in the Scenes tab
- Open the Compendium — Navigate to Characters (for PCs) or NPCs (for enemies)
- Drag the record onto the scene — Click and hold the character or NPC in the compendium, then drag it onto the map
- Release to place — The token appears with all stats, abilities, and inventory automatically linked
When you click a token on the map, it opens the full character sheet. This means every token is "live" and connected to its data — no manual linking or configuration required.
Moving Tokens
Tokens can be moved in multiple ways:
- Click and Drag — Most intuitive method; shows movement path and distance
- WASD or Arrow Keys — Precise grid-aligned movement (one keypress = one grid square)
- Numpad — Includes diagonal movement on square grids
Players can only move tokens they own, while the GM can move any token. This keeps the battlefield organized during combat.
Token Rotation, Facing, and Scaling
Tokens have facing direction, which affects line of sight and vision cones. To rotate a token:
- Select the token — Click it once
- Hold R — The rotation mode activates
- Move the mouse — The token rotates to follow your cursor
- Release R — The facing locks in place
Rotation isn't just cosmetic. A character's vision cone follows their facing direction, which matters for dynamic lighting and line of sight. This adds tactical depth — guards watching a doorway only see in the direction they're facing, and clever players can use that to their advantage.
Scaling Tokens: You can also resize tokens to represent larger or smaller creatures. Hover your mouse over a token and hold Ctrl while scrolling the mouse wheel. This is perfect for making a dragon token span multiple grid squares or shrinking a tiny familiar to half size.
Drawing Maps and Adding Walls
For GMs who want to create custom maps on the fly, Realm VTT's Canvas Scenes feature a fast drawing interface perfect for improvised dungeons, taverns, or outdoor encounters.
Creating a Canvas Scene
- New Scene → Canvas Scene — Select "Canvas Scene" from the scene type dropdown
- Choose Grid Size — Up to 100x100 cells for sprawling dungeons
- Pick Background Color — Darker colors work well for dungeons; lighter colors for buildings or outdoor areas
- Start Drawing — You're now in drawing mode with a blank grid
Drawing Walls
Walls are the foundation of any map. They define rooms, block movement, and automatically handle line of sight. Here's how to draw them:
- Click the Purple Wall Button — Located on the right side of the screen
- Click to Place Points — Each click places a wall segment endpoint
- Snap-to-Grid (Default) — Walls automatically align to grid intersections for clean, straight lines
- Hold Shift — Locks drawing to a specific axis (horizontal or vertical only)
- Press "S" — Switches to free-hand mode for organic cave walls or irregular terrain
- Double-Click to Finish — Completes the wall chain
Critical Detail: Walls in Realm VTT automatically include Line of Sight (LoS) properties. As soon as you draw a wall, it blocks vision on the other side. This means fog of war works immediately without additional setup — a huge time-saver compared to other VTTs.
Adding Doors and Windows
Doors and windows add interactivity to your maps:
- Select the Door or Window Icon — Right-side toolbar
- Draw Over an Existing Wall — The door/window automatically replaces that wall segment
- Snap-to-Grid (Default) — Doors align perfectly with grid squares
Doors can be opened and closed during play, which dynamically updates line of sight. A closed door blocks vision; an open door allows it. This creates natural fog of war gameplay where the party doesn't know what's in the next room until they open the door.
Editing and Erasing
Made a mistake? No problem:
- Undo — Press Ctrl/Cmd-Z to undo your last action
- Redo — Press Shift-Cmd-Z to redo
- Erase Tool — Click the Eraser icon, then click specific wall segments to delete them
Tips for Better Canvas Maps
- Keep it simple — A few rectangles and corridors are often all you need. The goal is spatial clarity, not artistic perfection.
- Draw walls first, then doors — Establish room layouts before adding interactivity.
- Use free-hand for caves — Natural terrain looks better with organic walls (press "S" to enable).
- Darker backgrounds for dungeons — Lighter colors for buildings and outdoor areas.
For a deeper dive into map drawing, see our Canvas Scenes Map Drawing Guide.
Running Your First Session: Core Gameplay Loop
With your characters created, modules imported, and a scene ready, here's the basic gameplay flow for an online D&D session in Realm VTT:
1. Set the Active Scene
Click the Map Icon next to your scene in the Scenes tab. This makes it the active playable area and shows it to your players.
2. Place Character Tokens
Drag each player character from the Characters compendium onto the scene. Assign ownership to the respective players so they can control their own tokens (right-click the token → Assign Ownership).
3. Use Fog of War
Enable Fog of War from the scene settings. This hides unexplored areas from players. As their tokens move, the fog recedes to reveal what they can see. The GM can manually reveal areas by clicking "Reveal to Players" on specific regions.
4. Drag and Drop Everything
Realm VTT's drag-and-drop philosophy extends beyond tokens:
- Sounds — Drag ambient audio onto the scene to create positional sound sources (crackling torches, tavern music, running water)
- Journals — Drop journal entries onto the scene as private GM notes pinned to specific locations
- Items — Drag weapons, potions, or treasure onto the map for players to discover and loot
- Spells & Abilities — Drag spell records onto the scene to show spell effects or areas of effect
For more on inventory and looting mechanics, check out our D&D 5e Looting Guide.
5. Using the Combat Tracker
The Combat Tracker is essential for managing turn order during combat encounters. To open it:
- Press O on your keyboard, or
- Click View in the top menu bar and select Combat Tracker
The Combat Tracker displays all tokens in initiative order and allows you to:
- Advance turns with next/previous buttons
- Roll initiative for all combatants at once
- Track rounds to manage duration-based effects
- Edit initiative values to adjust turn order manually
- Remove tokens when combatants are defeated or leave combat
Combat Tracker Carousel Mode: For a more cinematic experience, switch to Carousel View from the Combat Tracker menu (three dots). This mode displays combatant portraits in a horizontal carousel at the top of the screen, perfect for focusing on the current turn while keeping the map visible. Players can see whose turn it is without the Combat Tracker window taking up screen space.
![]()
6. Managing Your Party with the Party Sheet
The Party Sheet helps you track your entire party in one place. Open it from the View menu or by pressing its hotkey.
The Party Sheet has three tabs:
- Characters — View all party members' health, resources, and key stats at a glance
- Party Inventory — Manage shared loot and items that belong to the entire party
- Party Awards — Track experience points, gold, or other group rewards
Adding Characters to the Party Sheet: Drag character records from the Characters compendium directly onto the Party Sheet. Only the GM can add or remove characters, but all players can view the sheet to see the party's overall status.
7. Roll Dice and Track Initiative
When combat starts:
- Click the initiative button on each token's character sheet to roll initiative
- Use the Actions tab to make attack rolls, damage rolls, and saving throws
- Spell slots automatically deplete when spells are cast
- Concentration saves trigger automatically when damage is taken
The system handles the math, tracks resources, and keeps combat flowing smoothly.
8. Use the Ping Tool Liberally
Don't underestimate the power of pinging. When describing a location, ping it. When asking "Who's going first?", ping the door. When revealing a hidden trap, control-ping to snap everyone's camera to the danger. Pings eliminate the "Wait, where?" questions that slow down online play.
Exporting Custom Content as Modules
One of Realm VTT's most underrated features is the ability to export your custom content as reusable modules. This is perfect for:
- Creating a library of homebrew NPCs for future campaigns
- Saving custom magic items you've designed
- Packaging a full adventure with pre-built NPCs, encounters, and loot
- Sharing content with other GMs in your gaming group
How to Export a Module
- Open the Modules Menu — Click the Modules icon in the left drawer
- Click "Create Module" — This opens the module builder interface
- Name Your Module — Give it a descriptive name like "Homebrew NPCs Pack" or "My Custom Magic Items"
- Select Content to Include — Choose which records (NPCs, items, spells) to bundle into the module
- Add a Description — Include details about what the module contains and author info
- Save — Realm VTT creates the module in your account
- Import in Future Campaigns — Use the Modules menu and the Welcome Modal to load your custom content into any new campaign
Why This Matters
Most VTTs make you manually recreate homebrew content in every new campaign. With Realm VTT's module export system, you build something once and reuse it forever. Over time, you'll build a personal library of content tailored to your DMing style.
This is especially valuable for GMs running multiple campaigns in the same homebrew setting. Create a "World of [Your Setting]" module with all your custom NPCs, factions, and magic items. Every new campaign in that world starts with your full content library already loaded.
Sharing Modules with Other GMs
Exported modules are self-contained files you can share with friends, post in community forums, or even sell on the Realm VTT marketplace (if you want to contribute to the community). To learn more about contributing, see our guide on Contributing to the Realm VTT Marketplace.
Advanced Tips for Running Better Online Games
1. Pre-Load Your Scenes
Before the session starts, set up your key scenes with tokens, lighting, and fog of war configured. This eliminates awkward pauses mid-session while you scramble to set up the next encounter.
2. Use Macros for Repetitive Actions
Realm VTT supports custom macros that automate dice rolls and apply effects. If you're rolling initiative for five goblins every session, create a macro to do it with one click. See our Custom Macros Guide for details.
3. Organize Your Compendiums with Categories
As your campaign grows, you'll accumulate hundreds of NPCs and items. Use categories within compendiums to stay organized. Right-click any entry in a compendium and select Categorize to assign it to a category:
- "Session 1 Encounters"
- "Boss NPCs"
- "Loot Tables"
- "Recurring NPCs"
This saves time when you need to find something mid-session, as you can filter compendiums by category.
4. Communicate Camera Movement
In physical D&D, everyone sees the same table. Online, each player has their own camera. Get in the habit of saying "I'm pinging the door" or "Everyone look at the north hallway" before describing something spatially. The control-ping feature (hold Control while pinging) is your best friend for this.
5. Test Your Setup Before Session One
Before your first real session, do a quick 15-minute tech check with your players. Make sure everyone can:
- See the scene
- Move their token
- Roll dice
- Hear each other (using Discord, Zoom, or your preferred voice chat)
Realm VTT focuses on the tabletop experience, so you'll need a separate voice chat solution like Discord for audio. This prevents technical disasters during your actual session.
Troubleshooting Common Beginner Issues
"I can't see my players' tokens" → Check that the scene is active (blue indicator in Scenes tab) and that you've assigned token ownership to the players.
"Fog of War isn't revealing as my token moves" → Ensure Fog of War is enabled in scene settings and that the token has a light source configured (either darkvision or a carried torch).
"My walls aren't blocking line of sight" → First, make sure Enable Vision is turned on in Scene Settings (top-right gear icon). Then check that walls are drawn correctly: Walls in Canvas Scenes automatically block vision, but for Image Scenes, you need to draw walls manually using the Wall tool.
"I imported a module but can't find the content" → Open the specific compendium (NPCs, Spells, Items) and use the search bar. Module content integrates with your existing compendiums rather than creating new tabs.
"My players can't move their tokens" → Two things must be set: 1) Go to the Characters compendium, right-click the character, and select Set Owner to assign it to the player. 2) The token must be marked as Friendly — either right-click the token and change its faction, or press F while the token is selected to toggle between friendly/neutral/hostile. Players can only move tokens they own that are set to friendly.
Next Steps: Growing as an Online DM
You now have everything you need to run your first D&D session online with Realm VTT. As you get more comfortable with the basics, explore these intermediate features:
- Dynamic Lighting — Set up light sources and vision ranges for atmospheric exploration
- Ambient Audio — Use positional sound to create immersive environments
- Custom Tokens — Upload character art and NPC images to personalize your game (see Enhance Your Monsters with Custom Tokens)
- Grid Customization — Experiment with hex grids, isometric perspectives, and gridless maps (see Grid Settings Guide)
- Automation with Macros — Speed up repetitive tasks with custom dice roll macros
Most importantly, just start playing. The best way to learn any VTT is to run a session. Start with a one-shot adventure (Lost Mine of Phandelver or a simple dungeon crawl), learn the tools as you go, and don't worry about mastering everything immediately. Your players won't notice if you fumble a setting or forget a feature — they'll just be excited to play D&D online with you.
Ready to Start Your Online Campaign?
Realm VTT is built to get you playing fast with minimal setup. No hosting fees, no technical configuration, no hours of prep work before your first session. Create a free account, follow this guide, and you'll be running D&D online within the hour.
Launch Realm VTT and start your next adventure today.
Related Posts
- D&D 5e (2024 Ruleset) User Guide — Official documentation for D&D 5e mechanics in Realm VTT
- 5 Core Gameplay Tips for Realm VTT — Master tokens, movement, rotation, pings, and drag-and-drop
- Canvas Scenes Map Drawing Guide — Sketch dungeon maps on the fly with collaborative drawing tools
- Custom Macros in Realm VTT — Automate dice rolls and speed up your D&D 5e sessions
- Top 3 Roll20 Alternatives in 2026 — Compare Realm VTT, Foundry VTT, and Fantasy Grounds
- D&D 5e Looting Guide — Learn inventory management, treasure chests, and item distribution