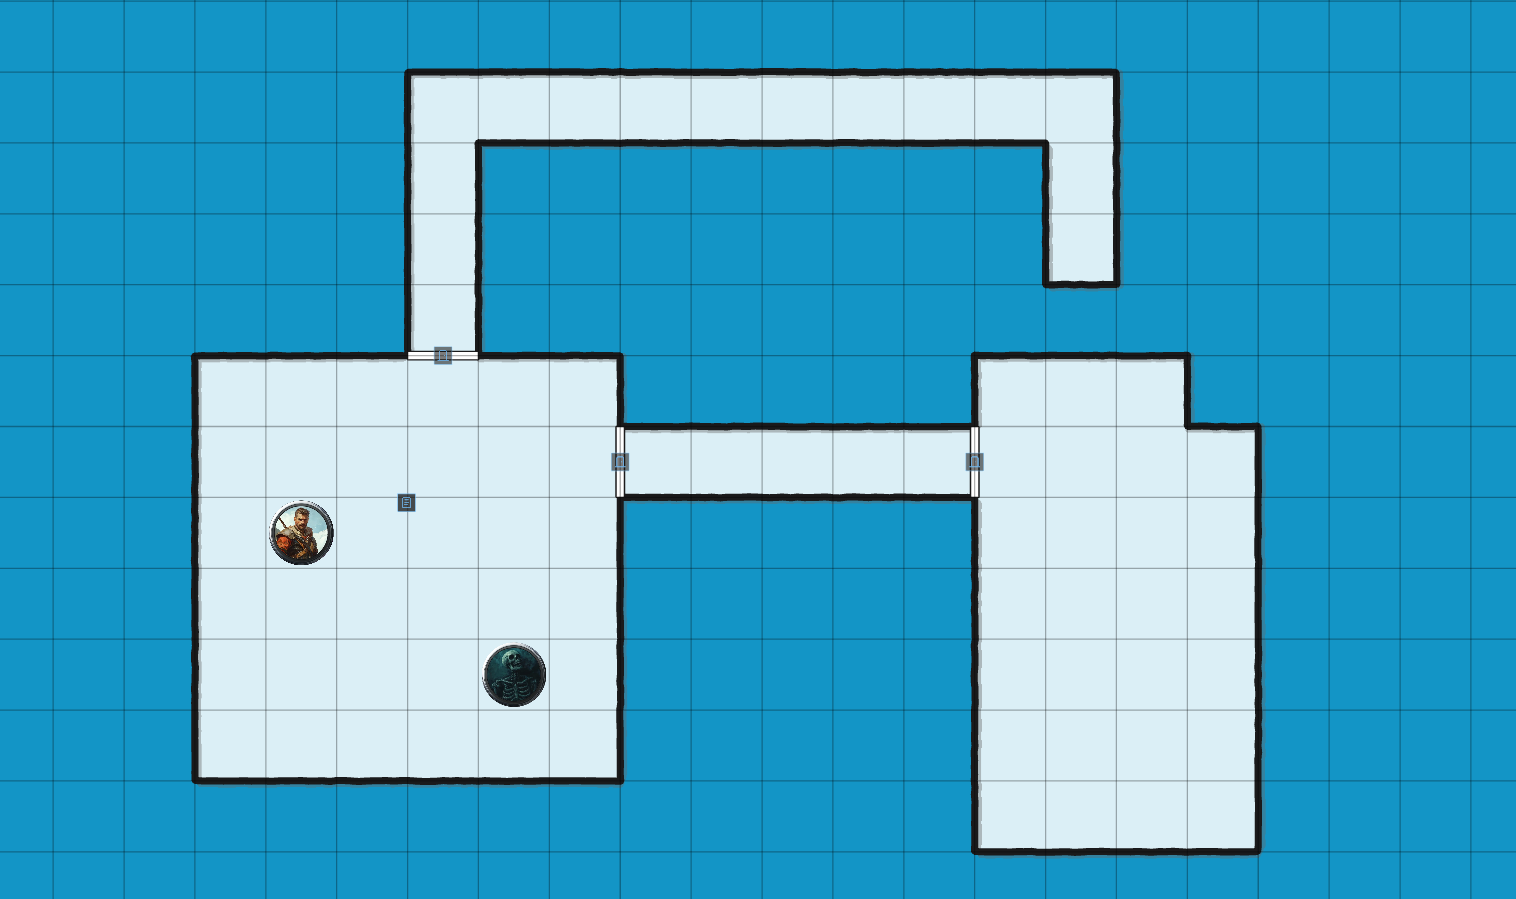
In Realm VTT, you can create Canvas Scenes to quickly sketch out basic maps. This is an essential tool for GMs who need to improvise a dungeon or terrain layout on the fly when a pre-made map isn't ready.
While we plan to expand this with multiple aesthetic styles in the future, the current version features a clean, Old-School (OSR) style with customizable background colors.
Why Canvas Scenes Matter for Your Game
Every GM has been there: the party goes off-script, kicks open a door you didn't plan for, and suddenly you need a map for the bandit hideout you improvised thirty seconds ago. Pre-made battlemaps are great when the session goes according to plan, but tabletop RPGs rarely go according to plan.
Canvas Scenes solve this problem by giving you a blank grid and a set of fast drawing tools. Instead of fumbling through map libraries or describing everything purely in theater-of-the-mind, you can sketch a quick layout in under a minute, place tokens, and keep the game moving. The result is a functional map that communicates room shapes, chokepoints, and spatial relationships without requiring any artistic skill.
This is especially valuable for sandbox-style campaigns, West Marches games, or any session where player agency drives exploration into uncharted territory.
Collaborative Mapping for Old-School Play
What makes Canvas Scenes truly unique is the ability for both GMs and Players to draw on the scene. This is perfect for old-school style adventuring where a designated player acts as the "mapper," documenting the party's progress through the dungeon in real-time.
In classic OSR play, the GM describes what the party sees and the mapper sketches it out on graph paper. Canvas Scenes bring this tradition into the digital space. The GM can describe a corridor, and the mapper draws it on the shared canvas. If they get it wrong or miss a detail, that becomes part of the fun. The GM can also draw sections to reveal areas the party has explored, creating a gradual unveiling of the dungeon as they push deeper.
This collaborative approach keeps players engaged and invested in the exploration itself, not just the combat encounters.
How to Create a Canvas Scene
- Open the Scenes Tab: Click on New Scene from the Left Drawer.
- Select Canvas Scene: Give your scene a name and select the Canvas Scene type.
- Configure Your Grid: Choose a size (up to 100x100 cells) and pick your preferred background color.
- Start Drawing! Once inside, you can begin laying out your dungeon immediately.
A few things to keep in mind when setting up your scene. The grid size you pick determines the total playable area, so think about the scope of the encounter. A small tavern brawl might only need a 20x20 grid, while a sprawling dungeon level could use the full 100x100. You can always resize later from the settings panel, so don't worry too much about getting it perfect on the first try.
For background color, darker tones like deep grey or black work well for underground dungeons and caves, while lighter colors suit outdoor terrain or building interiors. The background color sets the visual tone for the whole scene, so pick something that fits the fiction.
Drawing Tools & Shortcuts
The drawing interface is designed for speed and precision. Use these tools to build your map:
-
Walls: Click the purple Wall button on the right.
- Snap-to-Grid: Default behavior for straight lines.
- Restrict Direction: Hold Shift to lock to a specific axis.
- Free-hand: Press "S" to draw organic shapes.
- Note: Walls automatically include Line of Sight (LoS) properties.
-
Doors & Windows: Select the respective icon and draw anywhere. These tools automatically snap-to-grid and will auto-replace walls when drawn over them.
-
Erase & Edit: Use the Erase tool to click and delete specific segments.
-
Undo/Redo: Made a mistake? Use Ctrl/Cmd-Z to undo or Shift-Cmd-Z to redo your last action.
Getting the Most Out of Walls and Line of Sight
The fact that walls automatically carry Line of Sight properties is one of the most powerful aspects of Canvas Scenes. As soon as you draw a wall, it blocks token vision on the other side. This means you can sketch a dungeon and immediately have fog of war working without any additional setup.
When drawing walls, lean on snap-to-grid for corridors and rectangular rooms. This keeps your layout clean and ensures walls align properly at corners and intersections. Use the Shift key to lock your drawing direction when you need a perfectly horizontal or vertical line across a longer distance.
For natural cave systems, winding tunnels, or irregular terrain, switch to free-hand mode with the "S" key. Free-hand walls still carry LoS properties, so even organic shapes will properly block vision. This is great for creating caverns that feel less like a grid and more like a natural underground space.
Working with Doors and Windows
Doors and windows add interactivity and tactical depth to your maps. When you draw a door over an existing wall segment, it automatically replaces that section. Players and the GM can then open or close doors during play, which dynamically updates line of sight.
Strategically placed doors create interesting tactical choices. A closed door blocks vision, so the party doesn't know what's on the other side until they open it. Windows allow partial vision but still represent a physical barrier. Think about how these elements affect both exploration and combat when placing them.
A useful pattern is to draw all your walls first to establish the room layout, then go back and place doors at the appropriate entry points. This two-pass approach is faster than trying to handle walls and doors simultaneously.
Customizing Permissions and Settings
Access the Settings (top-right button) to fine-tune your scene:
- Resize: Expand or shrink the canvas as the adventure grows.
- Color Palette: Change the background color at any time.
- Player Controls: Toggle the ability for Players to draw on the map to suit your table's playstyle.
When to Enable Player Drawing
Enabling player drawing is a deliberate choice that changes the dynamic of your session. Here are some scenarios where it works well:
- OSR-style dungeon crawls where a player takes on the mapper role. The GM describes, the mapper draws, and the rest of the party watches the map take shape.
- Collaborative worldbuilding sessions where the group sketches out a town, region, or location together during session zero.
- Player-led recaps where someone draws out what they remember from the last session's exploration as a way to jog everyone's memory.
If your table prefers a more controlled experience where only the GM reveals the map, keep player drawing disabled. There's no wrong answer here; it depends on the kind of game you're running.
Practical Tips for Better Canvas Maps
Here are some tips drawn from real play experience to help you get the most out of Canvas Scenes.
Keep it simple. The goal of a canvas map isn't to create a work of art. It's to give your players enough spatial information to make meaningful tactical decisions. A few rectangles connected by corridors is often all you need.
Draw ahead of the party. If you know the general layout of a dungeon but don't have a pre-made map, sketch out the next few rooms before the session starts. You can then reveal them by moving tokens into line of sight range as the party explores.
Use color to convey information. Different background colors can represent different areas or levels of a dungeon. If the party descends to a lower level, create a new canvas scene with a darker background to reinforce the sense of going deeper underground.
Combine with image scenes when appropriate. Canvas Scenes are perfect for improvised layouts, but if you have a beautifully illustrated map for a key encounter, use an image-based scene for that. The two scene types complement each other well within the same campaign.